
3 Fun & Easy 3D Printer Projects for SMARTCore Labs Families
- SMART Core Labs Houston
- Jul 22, 2025
- 3 min read

As summer winds down and the back-to-school buzz begins, are you looking for a unique and exciting activity to share with your family? It’s time to move beyond the usual board games and movie nights and step into a world where your imagination becomes a physical reality. Welcome to the amazing world of 3D printing!
We’ve put together three fun and easy 3D printer projects for kids and families to tackle together. You don’t need to be an engineering expert—just bring your creativity and get ready for one of the most rewarding family STEM activities you can do right at home.
Bringing Imagination to Life: Why 3D Printing is the Ultimate Family Hobby
So, what exactly is 3D printing? Think of it like a high-tech hot glue gun, controlled by a precise robot that follows a digital map. It builds an object from the ground up, layer by tiny layer, until the design on your screen is a solid object in your hand.
The benefits go far beyond just creating cool trinkets. This process:
Fosters boundless creativity: If you can dream it and design it, you can make it.
Teaches basic engineering concepts: Kids naturally absorb ideas about design, structure, and spatial reasoning without even realizing they're learning.
Is incredibly rewarding: The look on a child's face when they hold a finished object they designed themselves is priceless. It’s a powerful confidence booster!
Project 1: Personalized Keychain or Bag Tag
This is the perfect first project. It’s simple, quick to print, and creates something your child can proudly attach to their backpack for the new school year.
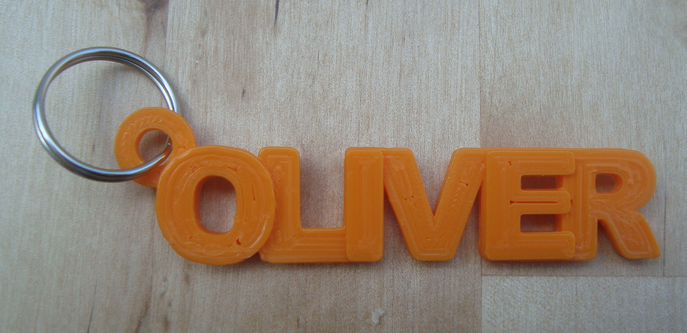
Skill Level: Beginner
What You'll Need:
A free, easy-to-use 3D design software like Tinkercad (Did you know our smartcore lab students learn how to use tinkercad?)
A 3D printer
PLA filament in your favorite color
Step-by-Step Guide:
Head to Tinkercad: Create a free (or use your current) account and start a new design.
Add Your Name: Find the "Text" shape on the right-hand menu and drag it onto the workplane. Type your child's name or initials.
Get Creative: Explore the other shapes! Add a star, a heart, or a simple border to make the design unique. Make sure all the shapes overlap slightly so they print as one solid piece.
Don't Forget the Hole: Drag a "hole" cylinder shape over one end of your tag to create a space for the keychain ring.
Export and Print: Click the "Export" button to download your design as an .STL file and send it to your 3D printer!
Project 2: A Custom Cookie Cutter
Combine technology with a tasty treat! This project is a huge hit and makes baking even more fun.
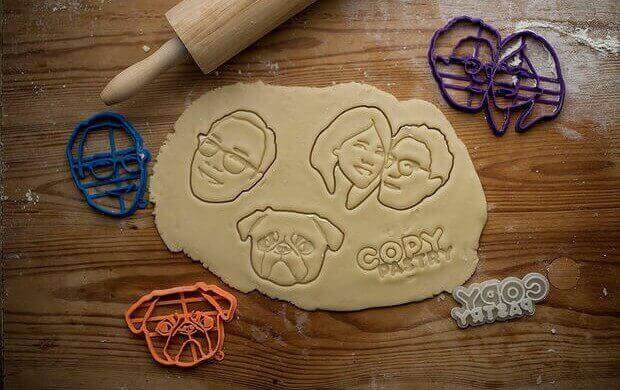
Skill Level: Beginner
What You'll Need:
Tinkercad
Food-Safe PLA filament (this is very important for anything that will touch food!)
Step-by-Step Guide:
Design Your Shape: In Tinkercad, you can use the "Scribble" tool to trace a simple drawing your child made, or you can combine basic shapes to create something new, like a rocket ship or a unique monster.
Create the Cutting Edge: Once you have your main shape, create a thinner outline of it to act as the cutting wall.
Combine and Export: Group the shapes together and export the file. Remember to follow your printer’s instructions for using food-safe filament.
Project 3: A Simple Planter for a Succulent
This project introduces a few more advanced concepts and results in a stylish piece of home decor.

Skill Level: Beginner/Intermediate
What You'll Need:
A design from a site like Thingiverse or one you create yourself
3D printer and filament
Step-by-Step Guide:
Find or Create a Design: You can find thousands of amazing, free planter designs on Thingiverse. Or, challenge yourselves to create a simple pot in Tinkercad using basic shapes.
Prepare the File for Printing: When you load the file into your printer's software, you can introduce two new concepts:
Scale: You can make the planter bigger or smaller to fit your plant perfectly.
Infill: This is how solid the inside of the print will be. Think of it like the crisscross pattern inside a cardboard box—it gives strength without being totally solid. An infill of 15-20% is perfect for a planter.
Print and Plant: Once it's done printing, add a small succulent and find the perfect spot on a windowsill!
Ready to Take Your Child's Creativity to the Next Level?
These at-home 3D printing projects are a fantastic gateway into the world of digital design and manufacturing. They build a foundation of creativity and problem-solving that is essential for STEM for kids.
At Smart Core Labs, we take these foundational skills and supercharge them. Our students learn not just how to print objects, but how to design complex parts for robots, create solutions to real-world problems, and integrate their designs with AI and coding.
These projects are just the beginning.


Comments